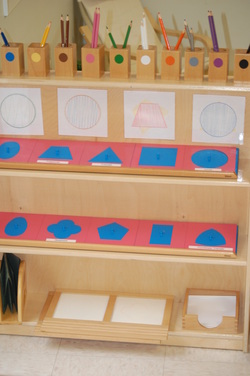
I will attempt while writing this blog to help the Montessori parent understand metal insets, one of the fundamental works in our classrooms. Metal insets were originally designed by Maria Montessori to prepare the hand for handwriting. The aim of this work is to help the child acquire proficiency in using a writing instrument, including lightness of touch, evenness of pressure, continuity of line, control of line, and familiarity with the curves and angles found in letters. It is to help them develop control and precision of movement with flexibility. It is also to give practice in crossing the midpoint from left to right and helps in the understanding of symmetry.
Wow, how is this all done? Montessori thought of everything. One work leads to another work. Prior to attempting this work a child will have worked in practical life pouring, polishing, push pinning-developing hand eye coordination. They would have also been introduced to the knobbed cylinders, geometric cabinet, touch boards and mystery bag.
Now they are ready for the initial presentation. There are 10 geometrical shapes. The frame is one color and the inset is a different color. The ten shapes are: rectangle, triangle, curvilinear triangle, circle, ellipse, quatrefoil, pentagon, square, trapezium and the oval.
The teacher shows the child how to collect the material used for an exercise on a tray. The teacher selects a simple figure, a sheet of inset paper and three different colored pencils. The teacher shows the child how to cover the inset paper with the frame. She then demonstrates the proper pencil grip and draws slowly around the inside of the frame with one of the colored pencils. The shape is then filled in using different colored pencils and straight horizontal parallel lines. As the children master this skill level additional exercises are introduced.
Although the direct aim is preparation for handwriting, the children are also being introduced to shapes that they eventually will have to learn. Instead of using simple shapes or designs, Maria Montessori is always thinking ahead! They are preparing their hands for the complexities of handwriting and learning geometric shapes!

 RSS Feed